Handbrake custom LapSharp values
This is a short how-to on how to set custom values for LapSharp sharpening in Handbrake.
Not sure if this is the right place to post this. I would have historically posted it to a dedicated sub-reddit on Reddit, but I can’t stand the owners of that website nowadays.
This is all original work, but I may myself repost this as a blog post at some point to try to improve reach if this gets burried.
Why?
I like Handbrake’s LapSharp sharpening, but I found I wanted something in between the Stronger and Very Strong presets, which have a big jump between them, for a movie I was encoding. Therefore, I was trying to find out how to use the “Custom” value in the drop-down to get something in between the two.
I am not an expert in video encoding nor a command line wizard, so I prefer to use Handbrake over FFMPEG for most encoding tasks.
Finding out how
A general search around the internet, a skim through the documentation and questions to the prominent AI tools of today gave me no (or incorrect) answers on how to set these values.
It was only with some extra digging through the handbrake forums that I found people posting their logs for an unrelated problems that I noticed that Handbrake logs the following when you encode with LapSharp:
<span style="color:#323232;">[09:01:35]  * video track
</span><span style="color:#323232;">[09:01:35]    + decoder: h264 8-bit (yuv420p)
</span><span style="color:#323232;">[09:01:35]    + filters
</span><span style="color:#323232;">[09:01:35]      + Framerate Shaper (mode=0)
</span><span style="color:#323232;">[09:01:35]        + frame rate: same as source (around 23.976 fps)
</span><span style="color:#323232;">[09:01:35]      + Crop and Scale (width=1920:height=1040:crop-top=20:crop-bottom=20:crop-left=0:crop-right=0)
</span><span style="color:#323232;">[09:01:35]        + source: 1920 * 1080, crop (20/20/0/0): 1920 * 1040, scale: 1920 * 1040
</span><span style="color:#323232;">[09:01:35]      + Sharpen (lapsharp) (y-strength=1.1:y-kernel=isolog:cb-strength=0.55:cb-kernel=isolog)
</span>
Sure enough, pasting this string into the Custom textbox when the Custom preset is selected gave me equivalent results to the Very Strong preset.
Looking through the source code of Handbrake, I found the function that converts presets to values. It’s written in C, which is not my forte, but we can see a bunch of if statements that pick values based on the Preset (Ultra-light, Light, Medium etc.) and the Tune (None, Film, Grain etc.). Comparing with my log, we can determine that In the code strength[0] is y-strength and strength[1] is cb-strength. Kernel is picked purely based on Tune value, and seems to always match between y-kernal and cb-kernal.
<span style="font-weight:bold;color:#a71d5d;">else if </span><span style="color:#323232;">(</span><span style="font-weight:bold;color:#a71d5d;">!</span><span style="color:#323232;">strcasecmp(preset, </span><span style="color:#183691;">"stronger"</span><span style="color:#323232;">))
</span><span style="color:#323232;">{
</span><span style="color:#323232;">    strength[</span><span style="color:#0086b3;">0</span><span style="color:#323232;">] </span><span style="font-weight:bold;color:#a71d5d;">= </span><span style="color:#0086b3;">0.5</span><span style="color:#323232;">;  strength[</span><span style="color:#0086b3;">1</span><span style="color:#323232;">] </span><span style="font-weight:bold;color:#a71d5d;">= </span><span style="color:#0086b3;">0.25</span><span style="color:#323232;">;
</span><span style="color:#323232;">}
</span><span style="font-weight:bold;color:#a71d5d;">else if </span><span style="color:#323232;">(</span><span style="font-weight:bold;color:#a71d5d;">!</span><span style="color:#323232;">strcasecmp(preset, </span><span style="color:#183691;">"verystrong"</span><span style="color:#323232;">))
</span><span style="color:#323232;">{
</span><span style="color:#323232;">    strength[</span><span style="color:#0086b3;">0</span><span style="color:#323232;">] </span><span style="font-weight:bold;color:#a71d5d;">= </span><span style="color:#0086b3;">1.1</span><span style="color:#323232;">;  strength[</span><span style="color:#0086b3;">1</span><span style="color:#323232;">] </span><span style="font-weight:bold;color:#a71d5d;">= </span><span style="color:#0086b3;">0.55</span><span style="color:#323232;">;
</span><span style="color:#323232;">}
</span>
Here’s a chart of values for Grain Tune:
Chart of parameter values at different presets
Ok, but how do I use it?
If you want to go between Presets values, simply interpolate (pick values between) two presets. For example, with Grain Tune, We can see from the code that
Stronger is y-strength=0.5:y-kernel=isolog:cb-strength=0.25:cb-kernel=isolog
Very strong is y-strength=1.1:y-kernel=isolog:cb-strength=0.55:cb-kernel=isolog
So, the mid-point between the two is y-strength=0.8:y-kernel=isolog:cb-strength=0.4:cb-kernel=isolog
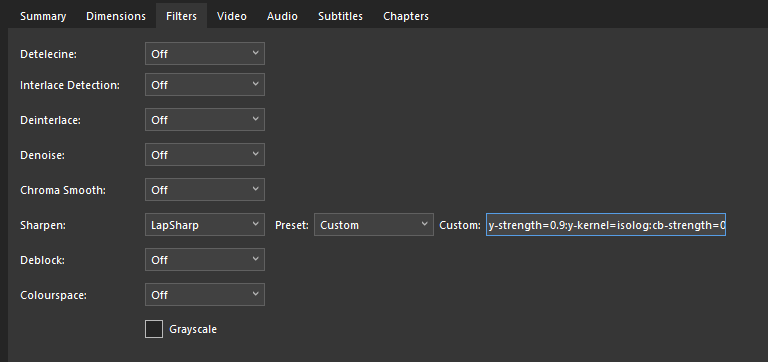
Then, simply copy-paste this into your Custom textbox:
Value pasted into Custom textbox in Handbrake UI
Conclusion
The approach above seems to work for me in the few cases where I need a bit more control than the presets afford. I recommend playing around a bit with the values yourselves and letting me know how you get on!
